Wednesday, July 18, 2012

Alberto the Dancing Alligator

Well...I have started working much harder on preparing for the upcoming school year (especially since I have to start from scratch!) because summer is ALMOST OVER!!! :(

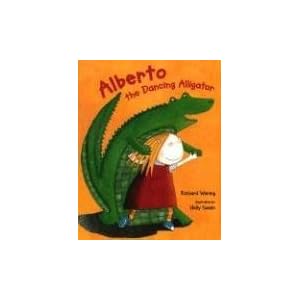
So far this summer, my 2-year-old and I have visited the library several times. A few times ago, we checked out a random alligator book because we had been talking about the letter A and alligators, and she really likes animals. The book was Alberto the Dancing Alligator, one I had never heard of before (click on the picture to head over to Amazon to check it out).

Alberto the Dancing Alligator
It ended up being a really cute little book! It's about a little girl and her pet alligator, Alberto, that both love to dance. One day while dancing in the bathroom, Alberto slipped, fell in the toilet and got flushed down to the sewer! (And don't worry, no gross toilet nonsense in this book.) The rest of the book describes his adventure under the city and how he makes it back home. I had to read it to her a bajillion times, of course, so now I also know it pretty well! Anyway, I ended up making a few activities to go along with the book for bigger kids but first, I'll show you my sweet little girl's alligators that she made!!:

Aren't they soooo cute?!? I'm not biased or anything. ;)


ANYWAY, I put together a little pack of activities that are appropriate for 1st-2nd and maybe 3rd graders. Here is the one of the writing activities included in the pack:

 And here is a sample page from the pack:


Head over to one of my stores to check out the rest of it!!
Be one of the first 4 people to comment (with an email address) and get a FREE copy of the pack!

I hope you like it!! :)

Sunday, July 15, 2012

DIY Graphing Mat

So I mentioned last post that I was at a week-long math conference. Well, it was called "Math Camp" and it was SOOOOO worth the 3 hour drive and money spent!!

Random thing I just HAVE to share: Me and my two camp buddies had a great stay at a super nice hotel for the week. However (haha), the following picture is of our neighbors' door! We're not quite sure what was going on there, but from Monday-Friday they had the "Do Not Disturb" sign on the door AND that towel stuffed at the bottom of the door!! They also would put out some random items next to the door sometimes. We could hear them talking and moving at night but never actually saw them leave. (I'm just wondering how they got clean towels if that sign never came off of the door??) I'm sure they're still there. And if this was you, I apologize and I need an explanation! ;)


ANYWAY, back on topic--Have you ever heard of Kim Sutton, Barbara Novelli, or Creative Mathematics (think Greg Tang and Marcy Cook)?? If not, you need to FIND OUT!! Follow one of the links to find out more because EVERY teacher needs to hang out and learn with them! They have A-M-A-Z-I-N-G stuff, they are both incredibly knowledgeable teachers, and are just downright wonderful people. I share the same passion they do about educating children, specifically in math. We also share a very important stance--in order to effectively teach children mathematics, teachers MUST know math themselves! I had such a wonderful week. I actually went to Barbara Novelli's K-1 session. Did any of you happen to be there??

We did a plethora of awesome activities and I am now overloaded and overflowing with new ideas. I actually asked Barbara about sharing some of her (and Kim's) ideas with you all in blog land and she was very supportive! I will be posting some of those later on because I will have to obtain permission for each idea prior to posting. I definitely do NOT want to violate any copyright laws or anything. :)

Barbara had this awesome graphing mat that she purchased from online that she uses to make all sorts of bar graphs with students using real objects. We went through a few activities ourselves with her modeling several ways of discussing the graphs with students. We had a make-and-take session one day and instead of making all of the items she suggested (being the rebel that I am) I decided to make my own version of her graphing mat. (Don't worry, I plan on making her materials later when I have all of the colors, patterns, etc. that I want). I'm linking up my graphing mat to Tara's weekly party!


The grid I made is two-sided with room for 4 outcomes on one side and 2 outcomes on the other. The boxes on the grid are used to hold objects based on the question. 
One way to use this with your class is to have the graph ready for answering when they walk in the door. It could be part of a morning routine or used at another transition time. Pick your objects based on the question to make it more fun and to better connect it to their lives. So, example-- I have a plate of marshmallows ready to go to answer this S'Mores question:

The students simply pick up an object and place it on the mat appropriately. Possible outcome:
 Here is another example using the 4-outcome side (and I just used a cutout of a house for this one for the sake of example):

You can use all sorts of questions and all sorts of objects to answer with! Let the students guide the discussions about the graphs! Let them share what they notice about the graph (beyond the most and the least). Also, encourage them to share connections and thoughts about the data (sample response, "Some people probably have not tried S'mores because they have probably have not been camping" or "Lisa probably hasn't eaten a S'More because she does not like chocolate.")

Now, I know that I may have more responses than I do boxes on the mat. I'm okay with the data going "off the charts!" Ideally, I want the boxes to be bigger, but I also want enough space to be able to fit real objects in. I could have made a bigger mat but opted not to so it fit in the space on my classroom floor I imagine it to go on. :)

To make the mat, you will need:
  • duct tape
  • plastic tablecloth (rectangular)
  • yard stick
  • pen or marker
  • scissors
  • Exacto knife or box cutter (optional)
I don't have pictures of the actual process, but it's pretty simple (though tedious). I bought a rectangular tablecloth and unfolded it except for one fold so the mat would be a little more durable. I then measured the length and width to figure out how many boxes might fit in it (the boxes are about 4" on each side). The most tedious part was taping! Luckily, duct tape goes off and on fairly easily. I did the border first and then tackled the horizontal and vertical lines.

Who says you don't use math in real life???!!?!?

DIY Recommendations:
  • I made mine on the very flat carpet of a school library. It worked out very well except the tape kept picking up stranger hair from the floor (shudder). Flat, non-shaggy carpet or tile would probably work best.
  • It would be helpful to draw lines on the mat before you tape. I didn't do that. :)
  • Cut the duct tape in half (lengthwise) before taping so you don't end up with ginormous tape lines. You can use an Exacto knife or box cutter to cut the tape while it is still on the roll or you can just lay out the tape and cut it with scissors
  • Make it two-sided! I am really excited about this versatility.

One final thing to share--I put together a quick list of possible questions to use with your graphing mat (as pictured below). Grab your free copy by heading over to one of my stores!


What do you think about this??

Friday, July 13, 2012

Look What's Happening!!

Helllllooooo!!! I haven't blogged in a little while because things are starting to pick up around here! I have been at a week-long (and out of town) math conference that has been A-M-A-Z-I-N-G!! I can't wait to implement and share these new ideas with you! Anywho, I've got two things going on right now:

1. MY Teachers Notebook shop is the featured shop this week--that was very exciting to find out! Stop by my shop and check out what I have!!! Tomorrow is my last day to be the featured shop, so I figured I would go out with a BANG and throw a sale! You will get 20% everything from NOW until Saturday. Click on the link above to take advantage!! :)

2. Lauren over at Life in Middle School is celebrating having 100 followers with a giveaway! Click on the button below to check out all of the GOODIES you can win!!! :)

Upcoming posts to look forward to:
1. DIY math materials
2. More Technology Camp stuff
3. Additional Daily 5 materials

Sunday, July 1, 2012

More Technology Camp Activities and Another Freebie

I talked about Technology Camp a few weeks ago and mentioned that I would revisit it. Check it out here, in case you missed it (and the bird poop painting!).

Anyway, we did lots of projects throughout the week and acted like the true scientists that we are! In addition to the bird poop painting, some other activities we did were a moldy potato experiment, kept a science journal, played a few games, explored germs and the importance of proper hand washing, tested diaper capacity and a few others! At the beginning of the week we went over how to hold a scientific discussion and respond in a science journal. The kids really soaked this up and did such a great job with it! We held some GREAT discussions--they sounded like little professionals!! To help scaffold their thinking and organize their thoughts, I wrote a few sentence starters on a chart (pictured below; sorry, I did not spend the time to make these charts as cute as they deserve to be--I'm a little embarrassed!):


I typed up these sentence starters on cards (so they can be displayed in a classroom) and even added a few more starters. The cards can be displayed on a bulletin board. I also made a reference sheet for students to put in science journals. Take a peek below--if you like it, click on it get your own free copy!


Thursday, June 28, 2012

A Little (Not School Related) Summer Reading!

*This is probably my first ever non-school post!*

So I have enjoyed laughing at the Catalog Living blog for the past 2 or so years. If you haven't come across it before, the blog author basically takes pictures from catalogs (like Pottery Barn, for example) and puts a funny caption on them to explain the scene. Maybe that sounds kind of lame, but it's H-I-L-A-R-O-U-S! Here are some examples of the posts to further explain:


Funny, right?!? (Anyone?.....Anyone?...) Anywho, I was SO excited to read that a book was in the works!! The book has all new content and I'm going to go laugh at it riiiiiiiight now! I recommend it (or at least the free blog) if you're looking for a little summer fun! ;)

Have you ever read Catalog Living??

Wednesday, June 27, 2012

Square Numbers and Daily 5--What Do They Have in Common??!?

What do Square Numbers and Daily 5 have in common??! They are the newest products in my store! I made an activity pack on Square Numbers to go along with a multiplication unit. You can see below that the pack includes a math journal page, 3 games, bookmarks, a chart, vocab cards and a cute little minibook with tutorial! I am so excited about it and sad that I won't get to use it with first grade, hahahahahaha. I hope this is something that you are able to use!


I also made rotation cards to go along with my ocean-themed Daily 5 and CAFE poster sets. I posted this to my store a few days ago and a lot of you have already downloaded it. Feel free to head over and download your FREE copy!


Available in kid clip art...
...or ocean clip art!
Snag any of the products listed above by visiting one of my shops! Click below to get there!

As always, if you are one of the first 3 people to comment, I will send you a free copy of the Square Numbers Activity Pack! Don't forget your email! :)


Tuesday, June 26, 2012

Monday Made It!


I am happy to participate this week (on Tuesday, haha)!!! I've been working on my teacher toolbox for like, 3 weeks now and FINALLY finished it! :) I'm into rainbows and fun colors, as you can see by my choice of spray paint. I didn't realize it would be that HOT orange, but I looooove it!!! It's SO me! And it will match my Chicka Chicka Boom Boom classroom!


What do ya think?!


*Since some of you asked--I (well...my husband, haha...) spray painted it with plastic primer first, then orange, and then a clear, glossy spray paint. And I'm pretty sure he only did one coat of each??*

Monday, June 25, 2012

Spring Symmetry!

Well, I OFFICIALLY finished Grad School on Saturday!!! And the good news is, I finished school with a BANG! I totally rocked the last course. This degree was a loooong and time-consuming journey but I did it and it's D-O-N-E. And with a 4.0 GPA. Thank you very much. ;) I find myself not knowing how to use all of this "extra" time I now have!! I am very excited to dedicate it to family, preparing for school, and BLOGGING! :)


So here's a post I meant to put up in April. Whoops. ;)


On one afternoon of our many, many state testing days (yes, 4 days constitutes as many, many) student teacher #3 and I decided that even though we were way behind in math and the next test was coming up soon and EVERY LITTLE SECOND COUNTS, the kids still needed to have fun after taking a test all day. Sooo we decided to do a quick little art activity in preparation for symmetry and transformations using these materials:


(I should have taken pictures while we were doing all of this!!! Aaahhhh!)

We cut up several pieces of string (between 12" and 16") and gave a few to each student. We then poured paint into the pie pans (one color per pan) and spread them out among the room. Each student had a piece of thick, white construction paper to use as their canvas. Before we started we talked a little about the line of symmetry, though not too much because I wanted to save it for after the activity. To begin, we folded the paper in half, then opened it up (which, of course, revealed one line of symmetry). After that they picked a paint color, dipped the string in it, placed it on one side of the paper, and refolded the paper. When they opened the paper and removed the string, they were amazed to see an awesome symmetrical picture! Take a look at some of these!!!!!:


And the best one...


This one turned out SOOOO cool!!! Can you see the dog face??! Totally unplanned by this little artist.


After the activity, we discussed more about the line of symmetry and how much FUN the kids had doing this activity. After that, we made new locker name tags that were symmetrical. That was incredibly difficult and required very refined fine motor skills (which 4th graders do not have, lol). It was a borderline NIGHTMARE to do but it came out great!! I don't have close-ups but you can make out some of the names. The kids folded a paper in half, wrote their name right above the fold on one side in block letters (making sure to connect the letters to each other and to the line of symmetry), and cut it out. We opened up the names and glued them onto another piece of paper so the name stood out.


I hope you enjoyed the activity pictures!

What do you do for symmetry?


Sunday, June 24, 2012

And the Winners Are...


Thanks, everyone!! You left such sweet comments! The winners of a free copy of the calendar set are:


Congratulations to Kaitlyn, Catherine and Heidi!! I will be emailing you soon! If you didn't win, you can grab a copy from one of my stores! And I'm thinking bugs may be the next set I make! Thanks for the input! :)


Saturday, June 23, 2012

Ocean-Themed Calendar Set

I fulfilled another request by making an ocean-themed calendar set! The set includes:
  • number cards 1-31, including 23/30 and 24/31 (3"wide x 2.75" tall)
  • headers for each month
  • headers for the days of the week
  • "Yesterday was", "Today is" and "Tomorrow will be" fill-in-the-blank cards
  • "Yesterday was", "Today is" and "Tomorrow will be" poster with cards for the days of the week
  • "Today's date is" fill-in-the-blank card
  • "Today's Temperature" fill-in-the-blank card

I really had fun making this one! I plan on making more sets using different themes. Any theme suggestions??

Would you like a copy of this set??? Check it out in my TPT or TN store. You can also comment below with an email address and I will randomly draw 3 names to win a free set at the end of the day. I hope you like it!!